- 책 또는 웹사이트의 내용을 복제하여 다른 곳에 게시하는 것을 금지합니다.
- 책 또는 웹사이트의 내용을 발췌, 요약하여 강의 자료, 발표 자료, 블로그 포스팅 등으로 만드는 것을 금지합니다.
Amazon Web Services에서 Docker 사용하기
이재홍 http://www.pyrasis.com 2014.08.02 ~ 2014.09.20
Git으로 Elastic Beanstalk Docker 애플리케이션 배포하기
이번에는 Git으로 Elastic Beanstalk Docker 애플리케이션을 Elastic Beanstalk 환경에 배포해보겠습니다.
Git을 설치하는 방법은 '8.1.1 개발자 PC에서 Git 설치 및 저장소 생성하기'를 참조하기 바랍니다.
Git을 설치했으면 Elastic Beanstalk 명령행 도구가 필요합니다. 구글에서 AWS Elastic Beanstalk Command Line Tool을 검색하거나 http://aws.amazon.com/code/6752709412171743에 접속하여 Download 버튼을 클릭하면 AWS-ElasticBeanstalk-CLI-2.6.3.zip 다운로드할 수 있습니다(이 책에서 설명한 버전보다 높을 수 있습니다).
AWS-ElasticBeanstalk-CLI-2.6.3.zip 파일을 사용자 홈 디렉터리(예: /home/pyrasis)에 받고 압축을 해제합니다(Windows와 Mac OS X에서는 탐색기와 Finder에서 zip 파일 압축을 해제합니다).
pyrasis@ubuntu:~$ wget https://s3.amazonaws.com/elasticbeanstalk/cli/AWS-ElasticBeanstalk-CLI-2.6.3.zip
pyrasis@ubuntu:~$ unzip AWS-ElasticBeanstalk-CLI-2.6.3.zip
unzip 설치
unzip 명령이 없다면 패키지를 이용하여 설치합니다.
[pyrasis@centos ~]$ sudo yum install unzip
pyrasis@ubuntu:~$ sudo apt-get install unzip
Elastic Beanstalk 명령행 도구를 실행하려면 Python이 필요합니다. Windows에는 Python이 기본적으로 설치되어 있지 않으므로 http://www.python.org/downloads에서 Python 2.7.x 버전을 받고 설치합니다. 설치 방법은 특별한 것이 없으므로 따로 설명하지 않겠습니다. 리눅스와 Mac OS X에는 Python이 기본적으로 설치되어 있습니다.
리눅스에서 Elastic Beanstalk 명령행 도구와 Python 버전
Elastic Beanstalk 명령행 도구를 사용하려면 Python 2.7 버전 이상이 필요합니다. 일부 CentOS와 Amazon Linux는 Python 2.6 버전이 설치되어 있습니다. Elastic Beanstalk 명령행 도구는 2.6 버전에서는 사용할 수 없으므로 2.7 버전을 설치합니다(이 책에서는 2.7 버전을 기준으로 설명하겠습니다. 3.0 버전 이상을 사용해도 됩니다).
[pyrasis@centos ~]$ wget https://www.python.org/ftp/python/2.7.6/Python-2.7.6.tgz
[pyrasis@centos ~]$ tar vxzf Python-2.7.6.tgz
[pyrasis@centos ~]$ cd Python-2.7.6
[pyrasis@centos Python-2.7.6]$ ./configure
[pyrasis@centos Python-2.7.6]$ sudo make; sudo make install
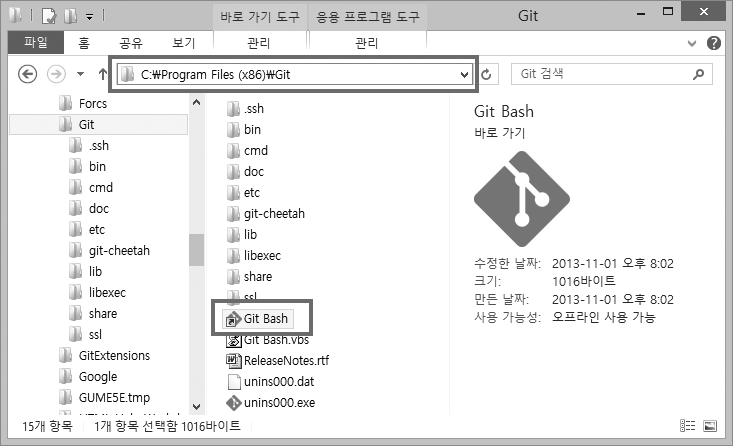
이제 Windows에서는 Git Bash를 실행합니다(Git Bash에서는 유닉스/리눅스 방식의 명령을 실행할 수 있으므로 지금부터 나오는 명령은 Mac OS X, 리눅스, Windows에서 모두 동일합니다). 리눅스와 Mac OS X에서는 터미널에서 그대로 진행합니다.
 그림 10-33 Windows에서 Git Bash 실행
Elastic Beanstalk 명령행 도구를 실행하려면 boto(https://github.com/boto/boto)가 필요합니다. 다음과 같이 입력하여 boto를 설치합니다.
- Windows Git Bash에서는 sudo를 제외하고
python setup.py install만 입력합니다. - CentOS, Amazon Linux에서 Python 2.7 소스를 컴파일하여 설치했다면
sudo python2.7 setup.py install을 입력합니다.
pyrasis@ubuntu:~$ git clone https://github.com/boto/boto.git
pyrasis@ubuntu:~$ cd boto
pyrasis@ubuntu:~/boto$ sudo python setup.py install
pyrasis@ubuntu:~/boto$ cd ..
Git 저장소를 생성하고, 저장소 디렉터리로 이동합니다.
~$ git init exampleapp
~$ cd exampleapp
방금 생성한 Git 저장소에 aws.push 명령을 설치합니다. AWSDevTools-RepositorySetup.sh는 Windows의 Git Bash에서 그대로 설치할 수 있습니다.
pyrasis@ubuntu:~/exampleapp$ ../AWS-ElasticBeanstalk-CLI-2.6.3/AWSDevTools/Linux/AWSDevTools-RepositorySetup.sh
Git에 AWS 액세스 키와 시크릿 키를 설정합니다.
- AWS Access Key: 액세스 키를 입력합니다.
- AWS Secret Key: 시크릿 키를 입력합니다.
- AWS Region: 리전 약칭을 입력합니다. 저는 Tokyo 리전인 ap-northeast-1을 입력했습니다.
- AWS Elastic Beanstalk Application: Elastic Beanstalk 애플리케이션 이름을 입력합니다. 앞에서 만든 exampleapp를 입력합니다.
- AWS Elastic Beanstalk Environment: Elastic Beanstalk 환경 이름을 입력합니다. 앞에서 만든 exampleapp-env를 입력합니다.
pyrasis@ubuntu:~/exampleapp$ git aws.config
 AWS Access Key: AKIAJMVSZ7VUHUCJJFNA
 AWS Secret Key: Sg1k7MeAZKKJbrtMKEdmF6wfoROqUA4kT+Im9OED
 AWS Region [default to us-east-1]: ap-northeast-1
 AWS Elastic Beanstalk Application: exampleapp
 AWS Elastic Beanstalk Environment: exampleapp-env
이제 간단한 웹 페이지를 작성할 차례입니다. 다음 내용을 app.js로 저장합니다.
var express = require('express');
var app = express();

app.get(['/', '/index.html'], function (req, res) {
  res.send('Hello Docker - Git');
});

app.listen(80);
Node.js npm 패키지 사용을 위해 다음와 같이 작성한 뒤 package.json로 저장합니다.
{
  "name": "hello",
  "description": "Hello Elastic Beanstalk",
  "version": "0.0.1",
  "dependencies": {
    "express": "4.4.x"
  }
}
다음 내용을 Dockerfile로 저장합니다.
FROM ubuntu:14.04

RUN apt-get update
RUN apt-get install -y nodejs npm

ADD app.js /var/www/app.js
ADD package.json /var/www/package.json

WORKDIR /var/www
RUN npm install

CMD nodejs app.js
EXPOSE 80
Git 저장소에 app.js, package.json, Dockerfile 파일을 커밋합니다.
pyrasis@ubuntu:~/exampleapp$ git add app.js
pyrasis@ubuntu:~/exampleapp$ git add package.json
pyrasis@ubuntu:~/exampleapp$ git add Dockerfile
pyrasis@ubuntu:~/exampleapp$ git commit -m "Hello Elastic Beanstalk"
이제 Elastic Beanstalk에 애플리케이션의 소스를 aws.push 명령으로 올립니다.
pyrasis@ubuntu:~/exampleapp$ git aws.push
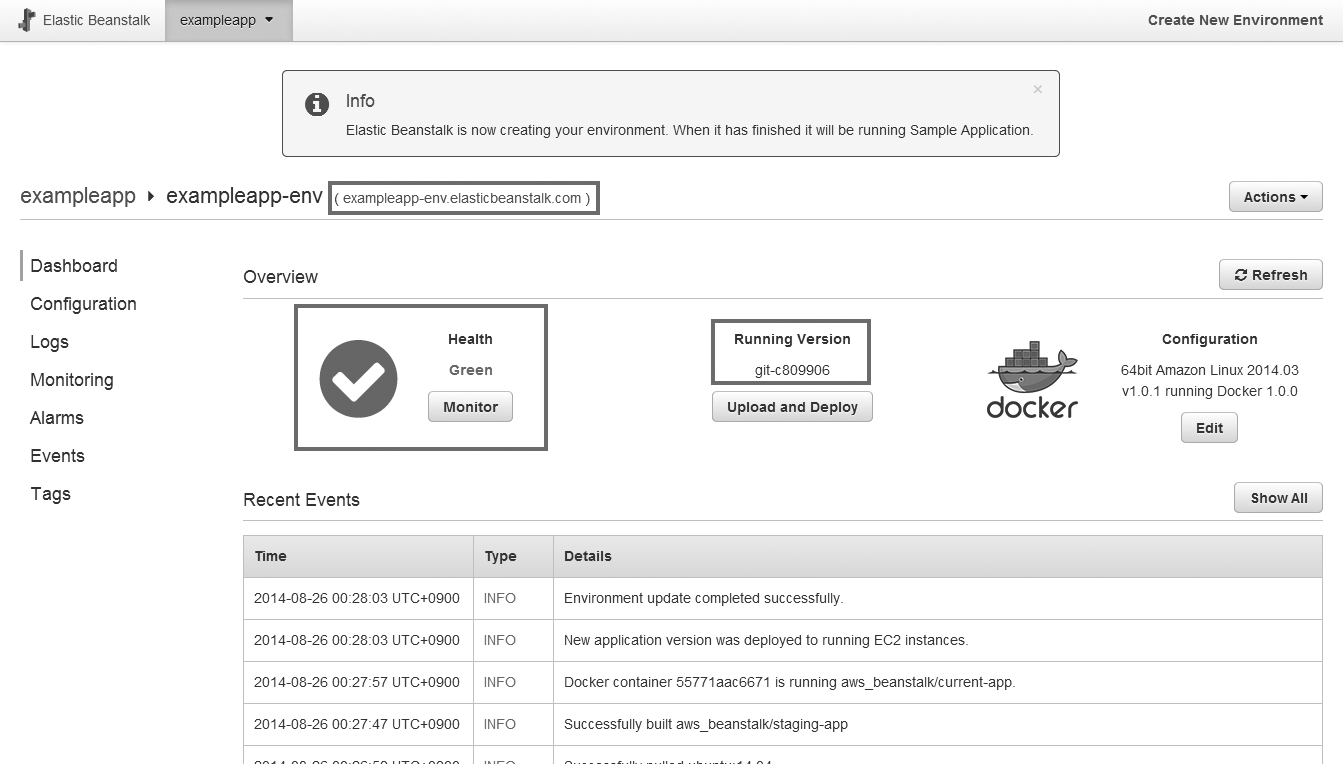
Elastic Beanstalk 환경 페이지로 이동합니다. 잠시 기다리면 Health가 Updating에서 Green으로 바뀌고, Elastic Beanstalk 애플리케이션 배포가 완료됩니다. 그리고 Running Version에는 git-<리비전>으로 표시됩니다. 이제 위쪽 <환경 이름>.elasticbeanstalk.com 링크를 클릭합니다.
 그림 10-34 Git으로 Elastic Beanstalk 애플리케이션 배포 완료
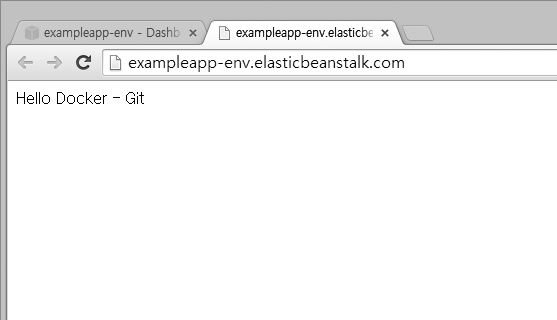
웹 브라우저에서 Elastic Beanstalk URL에 접속하면 app.js의 내용이 표시됩니다.
 그림 10-35 Elastic Beanstalk Docker 애플리케이션에 접속
저작권 안내
이 웹사이트에 게시된 모든 글의 무단 복제 및 도용을 금지합니다.- 블로그, 게시판 등에 퍼가는 것을 금지합니다.
- 비공개 포스트에 퍼가는 것을 금지합니다.
- 글 내용, 그림을 발췌 및 요약하는 것을 금지합니다.
- 링크 및 SNS 공유는 허용합니다.

 Kubernetes


