- 책 또는 웹사이트의 내용을 복제하여 다른 곳에 게시하는 것을 금지합니다.
- 책 또는 웹사이트의 내용을 발췌, 요약하여 강의 자료, 발표 자료, 블로그 포스팅 등으로 만드는 것을 금지합니다.
AWS에서 EC2로 Kubernetes 클러스터 구축하기
kOps로 클러스터 생성하기
AWS에 kOps로 Kubernetes 클러스터를 생성하는 구성도는 다음과 같습니다.
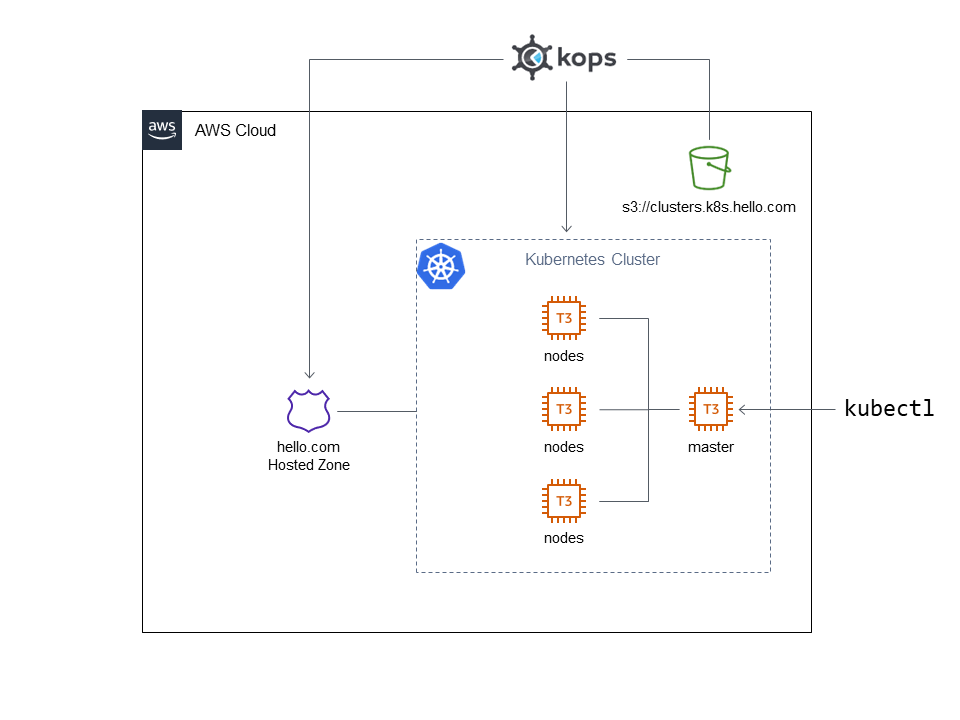 그림 7-5 kOps로 Kubernetes 클러스터 생성
S3 버킷 생성하기
kOps로 클러스터를 만들기 전에 인증서와 설정 정보를 저장할 S3 버킷을 만들어야 합니다. 다음 과정으로 S3 버킷을 생성합니다.
- AWS 콘솔 접속
- S3으로 이동
- 버킷 만들기 버튼 클릭
- 버킷 이름에
clusters.k8s.hellocluster.com입력(clusters.k8s.hellocluster.com은 제가 생성했으므로 각자 다른 것을 입력합니다. 예:clusters.k8s.hellocluster.com-1). 만약 도메인을 구입했다면clusters.k8s.<구입한 도메인>으로 입력합니다(<S3 버킷 이름>). - AWS 리전은 ap-northeast-2로 설정
- 버킷 만들기 버튼 클릭
EC2 키 페어 생성하기
이제 EC2 인스턴스에 접속할 키 페어를 생성할 차례입니다. 다음 과정으로 키 페어를 생성하고 다운로드합니다.
- AWS 콘솔 접속
- EC2로 이동
- 키 페어 메뉴 클릭
- 키 페어 생성 버튼 클릭
- 이름에 hellocluster 입력
- 프라이빗 키 파일 형식을 .pem 선택
- 키 페어 생성 버튼 클릭
이렇게 하면 hellocluster.pem 파일이 다운로드됩니다.
다음 명령을 실행하여 Private Key인 hellocluster.pem 에서 Public Key hellocluster.pub를 추출해냅니다.
$ chmod 400 ./hellocluster.pem
$ ssh-keygen -y -f ./hellocluster.pem > hellocluster.pub
icacls .\hellocluster.pem /reset
icacls .\hellocluster.pem /inheritance:r
icacls .\hellocluster.pem /c /t /grant ${env:UserName}:F
ssh-keygen -y -f .\hellocluster.pem | Out-File -Encoding ascii hellocluster.pub
Route 53 호스팅 영역 생성하기
kOps로 쿠버네티스 클러스터를 생성하려면 Route 53 호스팅 영역(hosted zone)이 필요합니다.
도메인을 구입한 경우
도메인을 구입했다면 구입한 도메인에 대한 호스팅 영역을 생성합니다. AWS에서 도메인을 구입했다면 자동으로 생성됩니다.
- AWS 콘솔 접속
- Route 53으로 이동
- 호스팅 영역 메뉴 클릭
- 호스팅 영역 생성 버튼 클릭
- 도메인 이름에 <구입한 도메인> 입력
- 호스팅 영역 생성 버튼 클릭
도메인을 구입하지 않은 경우
도메인을 구입하지 않은 경우 프라이빗 호스팅 영역을 생성합니다.
- AWS 콘솔 접속
- Route 53으로 이동
- 호스팅 영역 메뉴 클릭
- 호스팅 영역 생성 버튼 클릭
- 도메인 이름에 hellocluster.com 입력
- 유형을 프라이빗 호스팅 영역 선택
- 리전을 아시아 태평양(서울) [ap-northeast-2] 선택
- VPC ID는 기본 VPC 선택
- 호스팅 영역 생성 버튼 클릭
YAML 파일 생성하기
kOps는 커맨드라인 옵션을 사용하여 설정을 하는 방식이지만, 설정 파일을 Git 등으로 관리할 수 있도록 YAML로 만듭니다.
도메인을 구입한 경우
아래 s3://clusters.k8s.<구입한 도메인>은 본인이 생성한 S3 버킷의 이름으로 바꿔줍니다. 그리고 --name과 YAML 파일명에는 k8s.ap-northeast-2.aws.<구입한 도메인>을 입력합니다.
$ export KOPS_STATE_STORE=s3://clusters.k8s.<구입한 도메인>
$ kops create cluster --name=k8s.ap-northeast-2.aws.<구입한 도메인> --kubernetes-version=1.32.4 --cloud=aws --zones='ap-northeast-2a,ap-northeast-2b,ap-northeast-2c' --dry-run -o yaml > k8s.ap-northeast-2.aws.<구입한 도메인>.yaml
$env:KOPS_STATE_STORE="s3://clusters.k8s.<구입한 도메인>"
kops create cluster --name=k8s.ap-northeast-2.aws.<구입한 도메인> --kubernetes-version=1.32.4 --cloud=aws --zones='ap-northeast-2a,ap-northeast-2b,ap-northeast-2c' --dry-run -o yaml > k8s.ap-northeast-2.aws.<구입한 도메인>.yaml
인그레스를 생성했을 때 Route 53에 레코드를 자동 생성할 수 있도록 k8s.ap-northeast-2.aws.<구입한 도메인>.yaml 파일을 다음과 같이 수정해줍니다. 즉, spec 아래에 externalDns.watchIngress를 true로 설정해줍니다.
apiVersion: kops.k8s.io/v1alpha2
kind: Cluster
metadata:
  creationTimestamp: null
  name: k8s.ap-northeast-2.aws.<구입한 도메인>
spec:
  externalDns:
    watchIngress: true
  api:
    loadBalancer:
      class: Network
      type: Public
  authorization:
    rbac: {}
도메인을 구입하지 않은 경우
아래 s3://<S3 버킷 이름>은 본인이 생성한 S3 버킷의 이름으로 바꿔줍니다. 하지만, --name과 YAML 파일명에는 k8s.ap-northeast-2.aws.hellocluster.com을 그대로 입력해야 합니다.
$ export KOPS_STATE_STORE=s3://<S3 버킷 이름>
$ kops create cluster --name=k8s.ap-northeast-2.aws.hellocluster.com --kubernetes-version=1.32.4 --cloud=aws --zones='ap-northeast-2a,ap-northeast-2b,ap-northeast-2c' --dns private --dry-run -o yaml > k8s.ap-northeast-2.aws.hellocluster.com.yaml
$env:KOPS_STATE_STORE="s3://<S3 버킷 이름>"
kops create cluster --name=k8s.ap-northeast-2.aws.hellocluster.com --kubernetes-version=1.32.4 --cloud=aws --zones='ap-northeast-2a,ap-northeast-2b,ap-northeast-2c' --dns private --dry-run -o yaml > k8s.ap-northeast-2.aws.hellocluster.com.yaml
YAML 파일로 클러스터 생성하기
이제 앞에서 만든 YAML 파일로 클러스터를 생성해보겠습니다. 먼저 다음 명령을 실행하여 S3에 클러스터 설정 및 sshpublickey를 적용합니다. 아직은 EC2 인스턴스가 생성되지 않습니다.
도메인을 구입한 경우
$ cat ./k8s.ap-northeast-2.aws.<구입한 도메인>.yaml | kops create -f -
$ kops create sshpublickey --name k8s.ap-northeast-2.aws.<구입한 도메인> -i hellocluster.pub
cat .\k8s.ap-northeast-2.aws.<구입한 도메인>.yaml | kops create -f -
kops create sshpublickey --name k8s.ap-northeast-2.aws.<구입한 도메인> -i hellocluster.pub
이상이 없으면 실제로 적용을 해봅니다. 이제 실제로 EC2 인스턴스가 생성됩니다.
$ kops update cluster --name k8s.ap-northeast-2.aws.<구입한 도메인> --yes
W0623 14:21:48.315251   68391 update_cluster.go:359] error checking control plane running version, assuming no k8s upgrade in progress: cannot load kubecfg settings for "k8s.ap-northeast-2.aws.<구입한 도메인>": context "k8s.ap-northeast-2.aws.<구입한 도메인>" does not exist
I0623 14:22:28.034109   68391 executor.go:113] Tasks: 0 done / 123 total; 45 can run
I0623 14:22:28.183572   68391 keypair.go:226] Issuing new certificate: "etcd-manager-ca-main"
W0623 14:22:28.184756   68391 vfs_keystorereader.go:163] CA private key was not found
I0623 14:22:28.185658   68391 keypair.go:226] Issuing new certificate: "etcd-peers-ca-main"
I0623 14:22:28.185830   68391 keypair.go:226] Issuing new certificate: "etcd-clients-ca"
I0623 14:22:28.186345   68391 keypair.go:226] Issuing new certificate: "etcd-peers-ca-events"
I0623 14:22:28.194431   68391 keypair.go:226] Issuing new certificate: "etcd-manager-ca-events"
I0623 14:22:28.194431   68391 keypair.go:226] Issuing new certificate: "apiserver-aggregator-ca"
W0623 14:22:28.231591   68391 vfs_keystorereader.go:163] CA private key was not found
I0623 14:22:28.252556   68391 keypair.go:226] Issuing new certificate: "kubernetes-ca"
I0623 14:22:28.258623   68391 keypair.go:226] Issuing new certificate: "service-account"
I0623 14:22:29.660342   68391 executor.go:113] Tasks: 45 done / 123 total; 26 can run
I0623 14:22:33.254281   68391 executor.go:113] Tasks: 71 done / 123 total; 36 can run
I0623 14:22:36.816039   68391 executor.go:113] Tasks: 107 done / 123 total; 4 can run
I0623 14:22:38.206135   68391 executor.go:113] Tasks: 110 done / 123 total; 7 can run
I0623 14:22:39.370624   68391 executor.go:113] Tasks: 117 done / 123 total; 5 can run
I0623 14:22:39.653169   68391 executor.go:113] Tasks: 122 done / 123 total; 1 can run
I0623 14:22:39.748477   68391 executor.go:113] Tasks: 123 done / 123 total; 0 can run
I0623 14:22:45.807552   68391 dns.go:235] Pre-creating DNS records
I0623 14:22:46.083212   68391 update_cluster.go:412] Exporting kubeconfig for cluster
kOps has set your kubectl context to k8s.ap-northeast-2.aws.<구입한 도메인>
W0623 14:22:46.118927   68391 update_cluster.go:432] Exported kubeconfig with no user authentication; use --admin, --user or --auth-plugin flags with `kops export kubeconfig`

Cluster is starting.  It should be ready in a few minutes.

Suggestions:
 * validate cluster: kops validate cluster --wait 10m
 * list nodes: kubectl get nodes --show-labels
 * ssh to a control-plane node: ssh -i ~/.ssh/id_rsa ubuntu@
 * the ubuntu user is specific to Ubuntu. If not using Ubuntu please use the appropriate user based on your OS.
 * read about installing addons at: https://kops.sigs.k8s.io/addons.
AWS 콘솔에서 EC2 인스턴스 목록을 확인해보면 마스터와 워커 노드들이 생성되고 있을 것입니다.
다음 명령을 입력하여 ~/.kube/config에 방금 생성한 클러스터의 설정을 추가합니다.
$ kops export kubeconfig --admin
잠시 기다리면 EC2 인스턴스가 생성되고 클러스터가 초기화됩니다. kubectl get nodes 명령을 입력하여 노듣 목록을 출력해봅니다.
$ kubectl get nodes
NAME                  STATUS   ROLES           AGE     VERSION
i-010d992d71d0563b0   Ready    node            33s     v1.32.4
i-0491d4e85176934ff   Ready    node            38s     v1.32.4
i-068b605ff877242d1   Ready    control-plane   4m35s   v1.32.4
i-0f70f412547ea9c74   Ready    node            38s     v1.32.4
도메인을 구입하지 않은 경우
$ cat ./k8s.ap-northeast-2.aws.hellocluster.com.yaml | kops create -f -
$ kops create sshpublickey --name k8s.ap-northeast-2.aws.hellocluster.com -i hellocluster.pub
cat .\k8s.ap-northeast-2.aws.hellocluster.com.yaml | kops create -f -
kops create sshpublickey --name k8s.ap-northeast-2.aws.hellocluster.com -i hellocluster.pub
이상이 없으면 실제로 적용을 해봅니다. 이제 실제로 EC2 인스턴스가 생성됩니다.
$ kops update cluster --name k8s.ap-northeast-2.aws.hellocluster.com --yes
W0623 14:21:48.315251   68391 update_cluster.go:359] error checking control plane running version, assuming no k8s upgrade in progress: cannot load kubecfg settings for "k8s.ap-northeast-2.aws.hellocluster.com": context "k8s.ap-northeast-2.aws.hellocluster.com" does not exist
I0623 14:22:28.034109   68391 executor.go:113] Tasks: 0 done / 123 total; 45 can run
I0623 14:22:28.183572   68391 keypair.go:226] Issuing new certificate: "etcd-manager-ca-main"
W0623 14:22:28.184756   68391 vfs_keystorereader.go:163] CA private key was not found
I0623 14:22:28.185658   68391 keypair.go:226] Issuing new certificate: "etcd-peers-ca-main"
I0623 14:22:28.185830   68391 keypair.go:226] Issuing new certificate: "etcd-clients-ca"
I0623 14:22:28.186345   68391 keypair.go:226] Issuing new certificate: "etcd-peers-ca-events"
I0623 14:22:28.194431   68391 keypair.go:226] Issuing new certificate: "etcd-manager-ca-events"
I0623 14:22:28.194431   68391 keypair.go:226] Issuing new certificate: "apiserver-aggregator-ca"
W0623 14:22:28.231591   68391 vfs_keystorereader.go:163] CA private key was not found
I0623 14:22:28.252556   68391 keypair.go:226] Issuing new certificate: "kubernetes-ca"
I0623 14:22:28.258623   68391 keypair.go:226] Issuing new certificate: "service-account"
I0623 14:22:29.660342   68391 executor.go:113] Tasks: 45 done / 123 total; 26 can run
I0623 14:22:33.254281   68391 executor.go:113] Tasks: 71 done / 123 total; 36 can run
I0623 14:22:36.816039   68391 executor.go:113] Tasks: 107 done / 123 total; 4 can run
I0623 14:22:38.206135   68391 executor.go:113] Tasks: 110 done / 123 total; 7 can run
I0623 14:22:39.370624   68391 executor.go:113] Tasks: 117 done / 123 total; 5 can run
I0623 14:22:39.653169   68391 executor.go:113] Tasks: 122 done / 123 total; 1 can run
I0623 14:22:39.748477   68391 executor.go:113] Tasks: 123 done / 123 total; 0 can run
I0623 14:22:45.807552   68391 dns.go:235] Pre-creating DNS records
I0623 14:22:46.083212   68391 update_cluster.go:412] Exporting kubeconfig for cluster
kOps has set your kubectl context to k8s.ap-northeast-2.aws.hellocluster.com
W0623 14:22:46.118927   68391 update_cluster.go:432] Exported kubeconfig with no user authentication; use --admin, --user or --auth-plugin flags with `kops export kubeconfig`

Cluster is starting.  It should be ready in a few minutes.

Suggestions:
 * validate cluster: kops validate cluster --wait 10m
 * list nodes: kubectl get nodes --show-labels
 * ssh to a control-plane node: ssh -i ~/.ssh/id_rsa ubuntu@
 * the ubuntu user is specific to Ubuntu. If not using Ubuntu please use the appropriate user based on your OS.
 * read about installing addons at: https://kops.sigs.k8s.io/addons.
AWS 콘솔에서 EC2 인스턴스 목록을 확인해보면 마스터와 워커 노드들이 생성되고 있을 것입니다.
다음 명령을 입력하여 ~/.kube/config에 방금 생성한 클러스터의 설정을 추가합니다.
$ kops export kubeconfig --admin
잠시 기다리면 EC2 인스턴스가 생성되고 클러스터가 초기화됩니다.
우리는 실제로 hellocluster.com 도메인을 구입하지 않았으므로, 로컬에서 임시로 사용할 수 있도록 설정해야 합니다. 운영체제별로 설정 파일이 조금 다른데, 각자 운영체제에 맞는 파일을 수정합니다.
IP 주소는 클러스터의 마스터 노드 IP 주소를 사용해야 하는데, 다음과 같은 과정으로 IP 주소를 찾을 수 있습니다.
- AWS 콘솔 접속
- EC2로 이동
- 인스턴스 메뉴 클릭
- 이름이 control-plane-ap-northeast-2a.masters.k8s.ap-northeast-2.aws.hellocluster.com인 인스턴스 클릭 클릭
- 세부 정보에 퍼블릭 IPv4 주소 부분을 복사(<마스터 노드의 퍼블릭 IPv4 주소>)
리눅스, macOS는 /etc/hosts 파일을 수정해야 합니다. root 권한이 있어야 하므로 sudo vim으로 수정합니다.
$ sudo vim /etc/hosts
/etc/hosts 파일의 마지막 부분에 다음 내용을 추가한 뒤 저장합니다.
<마스터 노드의 퍼블릭 IPv4 주소> api.k8s.ap-northeast-2.aws.hellocluster.com
윈도우는 C:\Windows\System32\drivers\etc\hosts 파일을 수정해야 합니다. 관리자 권한이 필요하므로, 메모장을 관리자 권한으로 실행한 뒤 파일을 엽니다.
C:\Windows\System32\drivers\etc\hosts 파일의 마지막 부분에 다음 내용을 추가한 뒤 저장합니다.
<마스터 노드의 퍼블릭 IPv4 주소> api.k8s.ap-northeast-2.aws.hellocluster.com
메모장에서 hosts 파일이 보이지 않는다면?
메모장에서 hosts 파일이 보이지 않는다면, 열기 창에서 열기(O) 버튼 위의 텍스트 문서(*.txt)를 모든 파일 (*.*)로 바꿔주면 됩니다.
kubectl get nodes 명령을 입력하여 노듣 목록을 출력해봅니다. 노드 4개가 완전히 생성된 뒤 Ready 상태가 될 때까지 시간이 다소 걸립니다. 노드가 일부만 보인다면 조금 더 기다렸다가 명령을 실행해봅니다.
$ kubectl get nodes
NAME                  STATUS   ROLES           AGE     VERSION
i-010d992d71d0563b0   Ready    node            33s     v1.32.4
i-0491d4e85176934ff   Ready    node            38s     v1.32.4
i-068b605ff877242d1   Ready    control-plane   4m35s   v1.32.4
i-0f70f412547ea9c74   Ready    node            38s     v1.32.4
이렇게 kOps로 AWS에 쿠버네티스 클러스터를 생성해보았습니다. 다음 장에서는 Nginx 인그레스 컨트롤러를 설치한 뒤 로드밸런서(AWS의 ELB)에 웹 서버 디플로이먼트와 서비스를 연결하는 방법을 알아보겠습니다.
클러스터 삭제 방법
여기서 더 이상 진행하지 않고 클러스터를 삭제하려면 다음 명령을 실행합니다.
$ kops delete cluster --name k8s.ap-northeast-2.aws.<구입한 도메인> --yes
또는
$ kops delete cluster --name k8s.ap-northeast-2.aws.hellocluster.com --yes

저작권 안내
이 웹사이트에 게시된 모든 글의 무단 복제 및 도용을 금지합니다.- 블로그, 게시판 등에 퍼가는 것을 금지합니다.
- 비공개 포스트에 퍼가는 것을 금지합니다.
- 글 내용, 그림을 발췌 및 요약하는 것을 금지합니다.
- 링크 및 SNS 공유는 허용합니다.